Add Device |
This function adds a new device to the Val Link service.
Select the device Type from the drop-down box
where:
Normal is a physical vPod device not shared by multiple companies.
Master is a physical vPod device available for sharing by multiple companies.
Virtual is a device associated with a particular company in a Company Group and available for assignment to a Master (see Master Device and Virtual Device Considerations later in this section. |
|
Select the Model of the device from the drop-down box.
The Device Number is user-specified. For T5 and vPod, you may wish to match the ”Dev Num” assigned in the Comm Opt menu.
The Device Description should be informative, such as the room or area where the device is installed.
(T5 and vPod Only) The Serial Number should match the "Serial Num” stored in the Dev Info submenu of the Sys Info menu in the vPod.
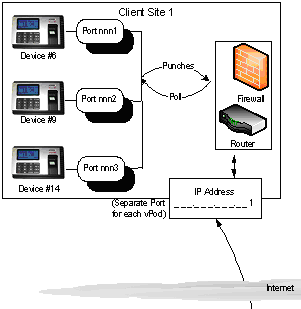
(T5 and vPod Only) The IP Address is the external address to be polled by Val Link. (This is not the same as the internal IP address of the device.) If not formatted correctly (nnn.nnn.nnn.nnn), the system displays an appropriate message.
Note If using a wireless device (vPodCell), enter the IP address provided you by Valiant. Enter 4370 for the Port number.
|
If there is more than one device using the same IP address, as shown here, enter the Port numbers from which Val Link will receive punch data.
Caution! The same IP and Port Combination can only exist ONCE in the system. Valid IP sets: 192.168.1.1 : 4370 192.168.1.1 : 4371 Invalid IP sets: 192.168.1.1:4370 192.168.1.1:4370
Note You must enter an IP address and Port Number for stand-alone devices (vPod Solo) |
(T5 and vPod Only) The default Clock Mode is Online. If the "Offline” flag is set , the IP Address and Port are set to zero and the device will not be polled. Set to Offline for vPod Solo.
|
|
(T5 and vPod Only) Set the Is Wireless flag to ”Yes” if this is a vPodCell or vPod Solo device.
|
|
(T5 and vPod Only) By default, Function Keys are enabled and users are required to press a function key (Shift Start, Shift End, etc.) before punching the clock.
|
|
(T5 and vPod Only) When Function Keys are disabled, users can punch without pressing a function key, however:
|
|
Select the Timezone where the device is located from the drop-down box. |
Employee Rules determine under what conditions the device accepts employee punches. Whenever a device rejects an employee punch, there is no update to the Vision Schedule or Val Link Transaction, Clock, Datalog, or Exception records. |
|
The device displays USERID nnnnn DISABLED USER under the following conditions:
|
If the Company has more than one Division, select the appropriate Division from the drop-down box.
If the Company has more than one Customer, select the appropriate Customer from the drop-down box.
|
|
If the device is located at a client’s Location, select it from the drop-down box.
If there is more than one Post assigned to the location, select it from the drop-down box. |
|
Enter the Contact Person responsible for device-related issues, as well as their Email and Phone details. (If the Email address is not formatted correctly (aa@aaa.aaa), the system displays an appropriate message.
|
|
If there are no Company Groups set up by the Valiant Administrator, the Master Device field is disabled.
|
|
When Work Code Mode is set to "None" (default) an employee is not prompted for a Work Code during fingerprint or password verification. |
Note to T5 users
If set to , any extended key functions (F6 to F8) configured by the Company Administrator in Punch Action Configuration cannot be utilized.
When set to Mode 1, prompts the employee to input a Work Code after fingerprint or password verification.
When set to Mode 2 prompts the employee to input a Work Code before fingerprint or password verification.
Click .
Note
If a required field is not populated, a red asterisk * is displayed next to the offending field. Entries will not be saved until all required fields are populated.